If you haven't heard already, the croissant-donut hybrid has been making headlines and has taken over the throne for trendiest dessert of the moment (from the cupcake, obvi). So clearly, I had to try to make them on my own just to see what all the fuss was about. In New York, people have been standing in line for hours at Dominique Ansel Bakery, the bakery that created the Cronut, just to get one.
I don't know about you guys out there, but I don't have time to be standing in line for desserts! That meant my only option was to try to create a version at home. I've had a few tasters that have tried the real thing taste my fauxnuts and they've said that I'm pretty close which I take great pride in! Because the Cronut name is trademarked, mine are fauxnuts. :)
Without further ado, here's the recipe I used- be warned that to make this, you'll need to start about 2 days in advance. The dough recipe was inspired by Top With Cinnamon:

Ingredients
1 cup cold milk (I used whole milk)
1/2 cup boiling water
1 tbsp active dry yeast
1/4 cup sugar
3 1/2 cup all purpose flour, extra for dusting your surface to roll out the dough
1 tsp salt
1 cup + 2tbsp butter, very cold
Corn oil for frying
For the sugar coating
1/2 cup sugar
1 tbsp cinnamon
For the glaze
3 tbsp water
1 1/4 cup powdered sugar
1 tsp vanilla extract
- Combine the boiling water and the cold milk. Add in the yeast and the sugar and stir until the yeast is all mixed in. Leave the bowl in room about 70 degrees so that the yeast has a chance to wake up and do its thing. Let it sit for about 10 minutes.
- Next, add in 3 1/2 cups of the flour and the salt. Start to knead the dough together until all the flour in the bowl is well incorporated. Use a little extra flour on the side if the dough gets too sticky to manage. The dough shouldn't be dry though so be careful not to add too much flour.


- Place that ball of dough in a new bowl that has been oiled and let rise for about an hour in the fridge.
- Take out the butter and cut it into slivers so that they form a large, flat rectangle about the dimensions of half a sheet of paper onto a sheet of wax paper.

- Place another sheet of wax paper on top of the butter slivers that you have lined up and mold it, with your hands and a rolling pin, into an even rectangle. Fold up the wax paper edges to seal in the butter and refrigerate for about 30 minutes as well. You want the butter to re-solidify, especially since it probably started to melt as you were shaping it.
- Remove the dough and roll it out into a large rectangle. It should be big enough so that you can fold it over to encapsulate the butter rectangle...because that's what you're going to do next. :)

- Using a rolling pin, roll the dough/butter combo out to about an 1/2 inch thick and then fold into thirds. Roll out the dough again and fold into thirds again. Try to keep rectangular dimensions. You'll want to fold the dough horizontally so that the long ends end up being the ends that are folded in. Place in the fridge for 1 hour. Each time you fold into thirds and roll out the dough, it's called a turn.
- Repeat the above step three more times to complete 4 total turns. Each time you complete a turn, the dough has to go back in the fridge and rest for about an hour so that the butter continues to keep a semi-solid texture that will prevent it from melting and getting absorbed into the dough. The separate layers is what creates an amazing texture when you bite into this tasty treat!
 |
| You should have layers like this! |
- The next day, take out one half at a time and roll them out to about 1/2 and inch thick. Using a circular cutter, cut the circles as close to each other as possible to maximize the amount of fauxnuts you'll get. With this recipe, I usually eke out about a 24 doughnuts (which will make 12 fauxnuts)- you want to make sure that you cut out an even number. Using a smaller circular cutter, cut out the fauxnut holes.

- Let them rest for about 30 minutes in the fridge after you've cut them out.
- To get the fauxnuts to puff as big as I like, I stack two of them together. So, using warm water, wet the top of each fauxnut and place one on top of the other until all your fauxnuts are paired up.
 |
| Everyone needs a partner, even fauxnuts! :) |
- While your oil is heating, mix the 1/2 cup of sugar with the cinnamon in a ziploc bag.
- Place the fauxnuts in 2 at a time and make sure to lower the heat if the temperature of the oil starts to get too high.
- After about 3 minutes, flip the fauxnuts over. They should be a nice golden brown. After 3 minutes on the other side, they are done! Remove them and place on a paper towel to catch the excess oil.


- Whisk together the water, vanilla extract, and powdered sugar until all the ingredients are fully melted into the water. Drizzle the finished icing over the sugar coated fauxnuts.
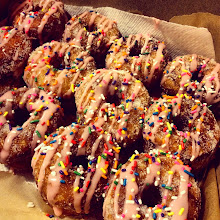
 |
| Perfection. |
Oh and the layers? See for yourselves...


No comments:
Post a Comment