With all the fuss that's been made about cronuts over the last year, I've spent a lot of time perfecting my croissant dough recipe and I thought that pairing my croissant dough with my cinnamon bun know-how would make a delicious treat. I was right!

Some of these instructions will look repetitive because it's about the same as making the dough for my fauxnut recipe, but I have posted the instructions here again for your convenience:
Croissant Dough Ingredients
1/2 cup cold milk (I used whole milk)
1/2 cup boiling water
1 tbsp active dry yeast
3 tbsp sugar
3 cup all purpose flour, extra for dusting your surface to roll out the dough
1/2 tsp salt
1 cup unsalted butter, very cold and diced into small bits
1 tbsp all purpose flour for the butter
Cinnamon Bun Filling Ingredients
1/3 cup sugar
1/3 cup brown sugar
1/2 tsp cinnamon
1/2 tsp vanilla extract
lemon zest of 1/2 a lemon
2 tbsp melted butter
- Combine the boiling water and the cold milk. Add in the yeast and the sugar and stir until the yeast is all mixed in. Leave the bowl in room about 70 degrees so that the yeast has a chance to wake up and do its thing. Let it sit for about 7 minutes, until the mixture is frothy.
- Next, add in 3 cups of the flour and the salt. Start to knead the dough together until all the flour in the bowl is well incorporated. This should take about 2 minutes. The dough shouldn't stick to your fingers, but it should be a nice, elastic ball.


- Place that ball of dough in a new bowl that has been oiled and let rise for about an hour in the fridge.
- Take out the butter bits and add 1 tbsp of flour to the flour. Then, form them into a large, flat rectangle about the dimensions of half a sheet of paper onto a sheet of wax paper.

- Place another sheet of wax paper on top of the butte/flour mix and mold it, with your hands and a rolling pin, into an even rectangle. Fold up the wax paper edges to seal in the butter and refrigerate for about 30 minutes as well. You want the butter to re-solidify, especially since it probably started to melt as you were shaping it.
- Remove the dough and roll it out into a large rectangle. It should be big enough so that you can fold it over to encapsulate the butter rectangle...because that's what you're going to do next. :)

- Using a rolling pin, roll the dough/butter combo out to about an 1/2 inch thick and then fold into thirds. Roll out the dough again and fold into thirds again. Try to keep rectangular dimensions. You'll want to fold the dough horizontally so that the long ends end up being the ends that are folded in. Place in the fridge for 1 hour. Each time you fold into thirds and roll out the dough, it's called a turn.
- Repeat the above step three more times to complete 4 total turns. Each time you complete a turn, the dough has to go back in the fridge and rest for about an hour so that the butter continues to keep a semi-solid texture that will prevent it from melting and getting absorbed into the dough. The separate layers is what creates an amazing texture when you bite into this tasty treat!
 |
| You should have layers like this! |
 |
| Fat dough baby! |
- When you're ready to make your buns, whisk together the sugars (brown and white), lemon zest, cinnamon, and vanilla extract. Make sure that you've removed the lumps.
- Take out one half at a time and roll it out to about a 1/4 and inch thick rectangle. Brush the rolled out dough with the melted butter- just enough so that your sugar mixture will stick to the dough. Sprinkle the sugar mixture on the dough and lightly press the it into the dough.

- Starting from one end, tightly roll the dough up. Cut the dough into 3 inch wide segments.


- Place them into an oiled cupcake pan and let them rest for 30 minutes in a warm place. Meanwhile, preheat your oven to 425 degrees.
- After about 30 minutes resting, the buns should have expanded and filled up the muffin tin. Place the buns in the oven at bake them for 5 minutes, then reduce the temperature to 350 degrees and back for 25 more minutes until the buns are toasted and brown.
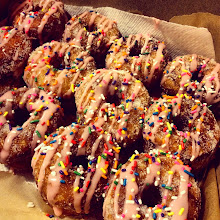
 |
| Et voila!! Gorgeous! |


While these buns take some time, I can guarantee to you that they are worth the work. The result is a really buttery and flaky cinnamon bun- crispy on the outside and soft on the inside like a croissant, and soft and cinnamon-y sweet like a cinnamon bun! If you want, you can make the cinnamon bun icing to go on it, but in my opinion, they were sweet enough. I ate two.
Enjoy!


No comments:
Post a Comment